Saturday, May 17, 2014

Delete An "Undeletable" File

Delete An Undeletable File


  • Open a Command Prompt window and leave it open.


  • Close all open programs.
  • Click Start, Run and enter TASKMGR.EXE
  • Go to the Processes tab and End Process on Explorer.exe.
  • Leave Task Manager open.
  • Go back to the Command Prompt window and change to the directory the AVI (or other undeletable file) is located in.
  • At the command prompt type DEL where is the file you wish to delete.
  • Go back to Task Manager, click File, New Task and enter EXPLORER.EXE to restart the GUI shell.
  • Close Task Manager.

Or you can try this


  • Open Notepad.exe

  • Click File>Save As..>locate the folder where your undeletable file is
  • Choose 'All files' from the file type box
  • click once on the file you wanna delete so its name appears in the 'filename' box put a " at the start and end of the filename (the filename should have the extension of the undeletable file so it will overwrite it)
  • click saveIt should ask u to overwrite the existing file, choose yes and u can delete it as normal

Here's a manual way of doing it

1. Start

2. Run

3. Type: command

4. To move into a directory type: cd c:\*** (The stars stand for your folder)

5. If you cannot access the folder because it has spaces for example Program Files or Kazaa Lite folder you have to do the following. instead of typing in the full folder name only take the first 6 letters then put a ~ and then 1 without spaces. Example: cd c:\progra~1\kazaal~1

6. Once your in the folder the non-deletable file it in type in dir - a list will come up with everything inside.

7. Now to delete the file type in del ***.bmp, txt, jpg, avi, etc... And if the file name has spaces you would use the special 1st 6 letters followed by a ~ and a 1 rule. Example: if your file name was bad file.bmp you would type once in the specific folder thorugh command, del badfil~1.bmp and your file should be gone. Make sure to type in the correct extension.


Tuesday, May 13, 2014

Feel from Stress, Tension, Headche

Feel from Stress, Tension, Headache


     Large Intestine 4 (Union Valley) - probably the MOST POWERFUL acupuncture point of them all!!!


     Squeeze the fleshy place between your index finger and your thumb, known as the Hoku (Union Valley) spot in Chinese medicine. Applying firm pressure there for just 30 secs can reduce stress and tension and works wonder for Headache. Press and hold the point until pain subsides and you feel the muscles relax.

Saturday, May 10, 2014

Basic Linux Commands

Basic Linux Commands


mkdir  - Make Directories

Usage

mkdir [OPTION] DIRECTORY

Options

Create the DIRECTORY(ies), if they do not already exist.

 Mandatory arguments to long options are mandatory for short options too.

 -m, mode=MODE  set permission mode (as in chmod), not rwxrwxrwx - umask

 -p, parents  no error if existing, make parent directories as needed

 -v, verbose  print a message for each created directory

 -help display this help and exit

 -version output version information and exit

cd - Change Directories

Use cd to change directories. Type cd followed by the name of a directory to access that directory.Keep in mind that you are always in a directory and can navigate to directories hierarchically above or below.

mv- Change the Name of a Directory

Type mv followed by the current name of a directory and the new name of the directory.

 Example: mv testdir newnamedir

pwd - print working directory

will show you the full path to the directory you are currently in. This is very handy to use, especially when performing some of the other commands on this page

 rmdir - Remove an existing directory

 rm -r

Removes directories and files within the directories recursively.

chown - change file owner and group

Usage

chown [OPTION] OWNER[:[GROUP]] FILE

chown [OPTION] :GROUP FILE

chown [OPTION] --reference=RFILE FILE

Options

Change the owner and/or group of each FILE to OWNER and/or GROUP. With --reference, change the owner and group of each FILE to those of RFILE.

 -c, changes like verbose but report only when a change is made

 -dereference affect the referent of each symbolic link, rather than the symbolic link itself

 -h, no-dereference affect each symbolic link instead of any referenced file (useful only on systems that can         change the ownership of a symlink)

 -from=CURRENT_OWNER:CURRENT_GROUP

  change the owner and/or group of each file only if its current owner and/or group match those specified here.  Either  may  be  omitted,  in which case a match is not required for the omitted attribute.

-no-preserve-root do not treat `/' specially (the default)

-preserve-root fail to operate recursively on `/'

-f, -silent, -quiet  suppress most error messages

-reference=RFILE use RFILE's owner and group rather than the specifying OWNER:GROUP values

-R, -recursive operate on files and directories recursively

-v, -verbose output a diagnostic for every file processed

The  following options modify how a hierarchy is traversed when the -R option is also specified. If more than one is specified, only the final one  takes effect.

-H     if a command line argument is a symbolic link to a directory, traverse it

-L     traverse every symbolic link to a directory encountered

-P     do not traverse any symbolic links (default)

chmod - Change File Access Permissions

Usage

chmod [-r] permissions filenames

 r  Change the permission on files that are in the subdirectories of the directory that you are currently in.        permission  Specifies the rights that are being granted. Below is the different rights that you can grant in an alpha  numeric format.filenames  File or directory that you are associating the rights with Permissions

u - User who owns the file.

g - Group that owns the file.

o - Other.

a - All.

r - Read the file.

w - Write or edit the file.

x - Execute or run the file as a program.

Numeric Permissions:

CHMOD can also to attributed by using Numeric Permissions:

400 read by owner

040 read by group

004 read by anybody (other)

200 write by owner

020 write by group

002 write by anybody

100 execute by owner

010 execute by group

001 execute by anybody

ls - Short listing of directory contents

-a        list hidden files

-d        list the name of the current directory

-F        show directories with a trailing '/'

            executable files with a trailing '*'

-g        show group ownership of file in long listing

-i        print the inode number of each file

-l        long listing giving details about files  and directories

-R        list all subdirectories encountered

-t        sort by time modified instead of name

cp - Copy files

cp  myfile yourfile

Copy the files "myfile" to the file "yourfile" in the current working directory. This command will create the file "yourfile" if it doesn't exist. It will normally overwrite it without warning if it exists.

cp -i myfile yourfile

With the "-i" option, if the file "yourfile" exists, you will be prompted before it is overwritten.

cp -i /data/myfile

Copy the file "/data/myfile" to the current working directory and name it "myfile". Prompt before overwriting the  file.

cp -dpr srcdir destdir

Copy all files from the directory "srcdir" to the directory "destdir" preserving links (-poption), file attributes (-p option), and copy recursively (-r option). With these options, a directory and all it contents can be copied to another dir

ln - Creates a symbolic link to a file.

ln -s test symlink

Creates a symbolic link named symlink that points to the file test Typing "ls -i test symlink" will show the two files are different with different inodes. Typing "ls -l test symlink" will show that symlink points to the file test.

locate - A fast database driven file locator.

slocate -u

This command builds the slocate database. It will take several minutes to complete this command.This command must be used before searching for files, however cron runs this command periodically  on most systems.locate whereis Lists all files whose names contain the string "whereis". directory.

more - Allows file contents or piped output to be sent to the screen one page at a time

less - Opposite of the more command

cat - Sends file contents to standard output. This is a way to list the contents of short files to the screen. It works well with piping.

whereis - Report all known instances of a command

wc - Print byte, word, and line counts

bg

bg jobs Places the current job (or, by using the alternative form, the specified jobs) in the background, suspending its execution so that a new user prompt appears immediately. Use the jobs command to discover the identities of background jobs.

cal month year - Prints a calendar for the specified month of the specified year.

cat files - Prints the contents of the specified files.

clear - Clears the terminal screen.

cmp file1 file2 - Compares two files, reporting all discrepancies. Similar to the diff command, though the output format differs.

diff file1 file2 - Compares two files, reporting all discrepancies. Similar to the cmp command, though the output format differs.

dmesg - Prints the messages resulting from the most recent system boot.

fg

fg jobs - Brings the current job (or the specified jobs) to the foreground.

file files - Determines and prints a description of the type of each specified file.

find path -name pattern -print

Searches the specified path for files with names matching the specified pattern (usually enclosed in single quotes) and prints their names. The find command has many other arguments and functions; see the online documentation.

finger users - Prints descriptions of the specified users.

free  - Displays the amount of used and free system memory.

ftp hostname

Opens an FTP connection to the specified host, allowing files to be transferred. The FTP program provides subcommands for accomplishing file transfers; see the online documentation.

head files - Prints the first several lines of each specified file.

ispell files - Checks the spelling of the contents of the specified files.

kill process_ids

kill - signal process_ids

kill -l

Kills the specified processes, sends the specified processes the specified signal (given as a number or name), or prints a list of available signals.

killall program

killall - signal program

Kills all processes that are instances of the specified program or sends the specified signal to all processes that are instances of the specified program.

mail - Launches a simple mail client that permits sending and receiving email messages.

man title

man section title - Prints the specified man page.

ping host - Sends an echo request via TCP/IP to the specified host. A response confirms that the host is operational.

reboot - Reboots the system (requires root privileges).

shutdown minutes

shutdown -r minutes

Shuts down the system after the specified number of minutes elapses (requires root privileges). The -r option causes the system to be rebooted once it has shut down.

sleep time - Causes the command interpreter to pause for the specified number of seconds.

sort files - Sorts the specified files. The command has many useful arguments; see the online documentation.

split file - Splits a file into several smaller files. The command has many arguments; see the online documentation

sync - Completes all pending input/output operations (requires root privileges).

telnet host - Opens a login session on the specified host.

top - Prints a display of system processes that's continually updated until the user presses the q key.

traceroute host - Uses echo requests to determine and print a network path to the host.

uptime - Prints the system uptime.

w - Prints the current system users.

wall - Prints a message to each user except those who've disabled message reception. 
Type Ctrl-D to end the message.

Tuesday, May 6, 2014

How To Use Mobile Camera As A WebCam

How To Use Mobile Camera As A WebCam


  • Step 1: Install Windows [EXE] (SmartCam.exe on your PC and Install)

  • Step 2: Install Smartcam on your Mobile (Symbian S60 2nd Edition [SIS], S60 2nd Edition, JME [JAR], Windows Mobile [CAB], Android [APK]

  • Step 3: Start up SmartCam on your PC and go to >>> File >>> Settings and check your connection and proceed >>> next step.

  • Step 4: Start SmartCam on your phone and go to Options Connect and it will ask you for server name and you need to type your PC IP address or your system name.


If YOU don't know your IP address then, go to RUN type CMD type ipconfig

Saturday, May 3, 2014

How To Install Linux Mint 16 In Dual Boot With Windows And Their Solutions

Guide To Install Linux Mint 16 In Dual Boot With Windows


     Last week I switched from Ubuntu 13.10 to Linux Mint 16 (which is also based on Ubuntu 13.10). For the sake of experimenting, I have been switching between Linux distributions quite frequently in recent times. I always dual boot Linux with Windows. As I leaned more towards Linux, I started using Windows less and less. In fact, now I hardly use it. But I just kept it as it is sort of back up if I screw up my system while playing with Linux. Dual booting Linux with Windows is always suggestible for the beginners. And in this article, I’ll show you how to install Linux Mint in dual boot with Windows. Once you have installed it, you can also check out things to do after installing Linux Mint 16.

     Before we proceed to see the procedure to dual boot Linux Mint 16 with Windows, let me give you some details. First, I had Windows 7 installed with 3 partitions on it. Later I installed Linux on it in dual boot mode. I changed the partition and kept around 100 GB of total 320 GB for Linux installation. In the course of time, I upgraded to Windows 8 and subsequently to Windows 8.1. I never had to face the problem of Windows 8's secure boot thingy. It is just to clarify that this process does not show you how to deal with UEFI.

Install Linux Mint 16 in dual boot with Windows 8:

     Follow the steps below to install Linux Mint in dual boot with Windows:

Step 1: Create a live USB or disk

    Download and create a live USB or DVD. If you are using Windows, you can use a live usb creator tool. In Ubuntu, you can use Startup Disk Creator (if it works).

Step 2: Boot in to live USB

     Plug the live USB or disk in to the computer and restart the computer. While booting the computer press F10 or F12 function key (defers from computer to computer) to go to the boot menu. Now, choose the option to boot from USB or Removable Media.

Step 3: Start the installation

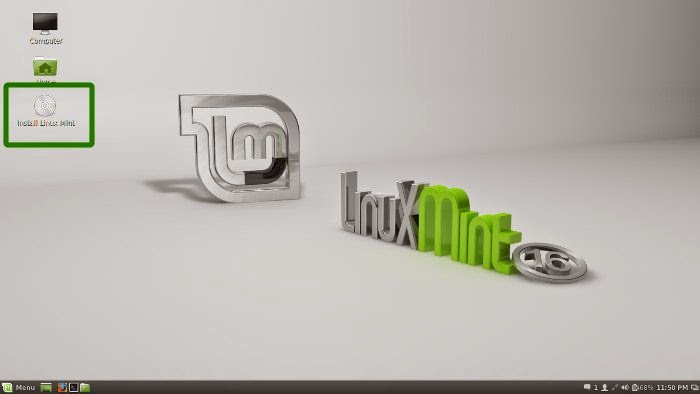
     It takes some time to boot from the live USB or disk. Have some patience. Once it boots in to live disk, you’ll be provided to Try Linux Mint or Install Linux Mint. Even if you choose to try it, you can find the install option on the desktop:


     In next few screens, you’ll be asked to choose the language of the operating system. It will then do some checks on available space, battery and Internet connection.


Step 4: Prepare the partition

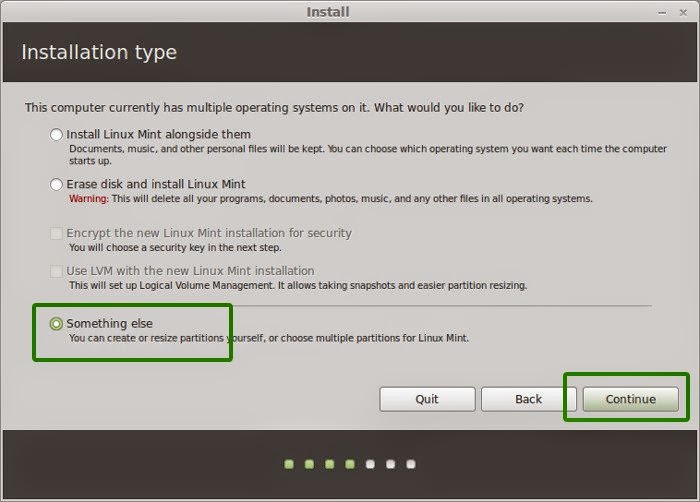
     This is the most important part of the whole installation. Where to install Linux Mint? As mentioned before, I prefer separate partitions for Windows and Linux. Windows is already installed here, we’ll prepare a new partition for Linux Mint. In the Installation Type window, choose Something Else:


     Now, I have 3 NTFS and some ext4 partitions. If you don’t have ext4 partition, don’t worry, we don’t need that. As you can see in the picture below, one of the NTFS partition consists of Windows installation. This should be untouched if you want to keep your Windows installation safe.

     I hope you have more than one NTFS (or FAT 32) partitions (i.e. Drives in Windows term) on your hard disk, with one of them consisting of Windows installation (usually C drive). What you need to do here is to delete a NTFS or existing ext4 partition and create some free space. This will delete all the data in that partition and this is why I asked you to verify if you have Windows installed in a different partition.

Click on the desired partition and press the - to delete the partition.


Step 5: Create root, swap and home

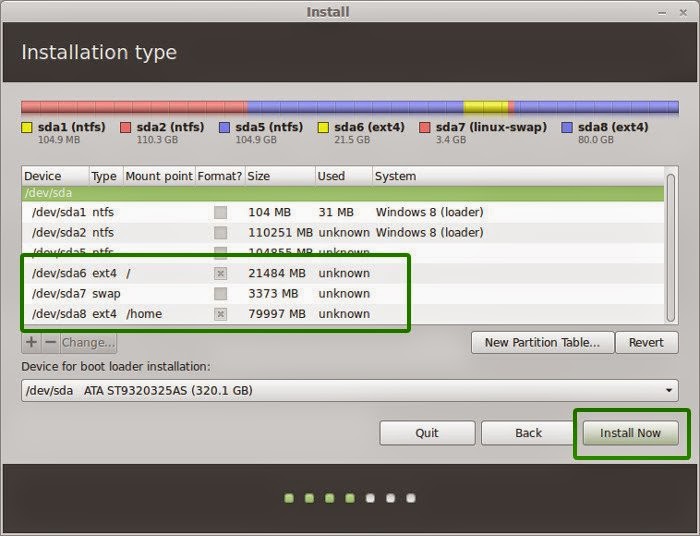
     Once you created free space on your hard drive, its time to install Linux Mint on it. Now, there are several ways to do it. But here, I’ll show you my favorite way and that is to have a Root, a Swap and a Home.

Create a root partition first. Choose the free space available and click on +.


Here, choose the size of root (10 GB is enough but I chose to have 20 here), choose ext4 file system, and mount point as / (i.e. root):


Now, next is to create swap partition. It is advised by many that Swap should be double of your RAM. You can choose the swap size accordingly.


The next step is to create Home. Try to allocate the maximum size to Home because this is where you’ll be downloading and keeping the files.


Once you have created Root, Swap and Home partitions, click on Install Now button.


Step 6: Follow the trivial instructions

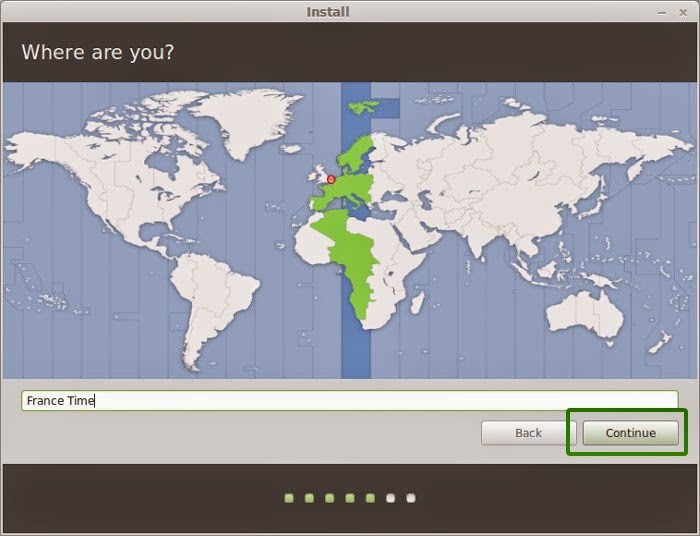
     Technically, you have crossed the main hurdle if you react till this point successfully. Now you will be taken through a number of screens to select options like keyboard layout, login credentials etc. You don’t need to be a genius to figure out what to do here afterwards. I have attached screenshots for reference purpose here.


Once the installation is over, you will be presented with the option to keep trying live version or to restart the system.


And that would be it. On next boot, you will see the option of Linux Mint on the grub screen. And thus you can enjoy the beautiful and beginner friendly Linux distribution. I hope you found this guide to Linux Mint 16 dual boot with Windows helpful.

If you found this type of issues in Linux


  • Cannot boot into Linux Mint or Ubuntu after installing (dual-boot Windows)
  • Use EasyBCD click here to download torrent file
Bootloader tweaking utility EasyBCD makes dual booting between Windows, Linux, and even OS X an easy task, and the latest version updates with support for Windows 7 and newer Ubuntu versions with grub2.


You can see the list of booting options if u cannot find Linux in your partition option add it manually


Go to option Add New Entry click on Linux/BSD tab and change the drive to your Linux installation click Add Entry & follow the below instructions


After adding entry you can see the option in Edit Boot Menu Windows 7 & Linux and click on Save Settings and reboot.


If you found this type of issues in Windows

Method 1:

If you cannot Boot in to Windows after installing Linux Mint and you face this type of  issue

Disk Failure 
Ctrl + Alt + Delete to restart

Just insert your windows 7 DVD or USB then press shift + F10 it will open the command prompt

Simply type this commands:

bootrec /fixmbr

bootrec /fixboot

and finally you can boot in to Windows as well as Linux Mint

Method 2:

Another method to solve Windows Boot loader issue is Insert USB or DVD of Windows 7


Click Repair your computer

Go to the command prompt and follow the commands below.

       bootrec.exe /FixMbr

     If successful, you should be greeted with the message The operation completed successfully.  That's it!  Your Master Boot Record has been repaired.

     While the above command does fix the MBR, and sometimes that is enough, there still might be an error with the system partition's boot sector and Boot Configuration Data (BCD). This might occur if you have tried to install another operating system alongside Windows 7, such as Windows XP.  To write a new boot sector, try the following command:


        bootrec.exe /FixBoot 

     If you are still faced with your Windows 7 installation not being detected during start up, or if you wish to include more than one operating system choice to your system's boot list, you can try the following command to rebuild your BCD:
        
        bootrec.exe /RebuildBcd

     The above command will scan all your disks for other operating systems compatible with Windows 7 and allow you to add them to your system's boot list. 

Finally you got this boot screen after reboot.


Now you have Installed Dual Boot with Windows cheers...

How to Copy Text From a Protected Web Sites & Web Pages

How to Copy Text From a Protected Web Sites & Web Pages

     Sometimes websites have a security feature in place that protects the text of the website to prevent users from stealing site content. But websites aren't around forever and sometimes users may want to download the site content as referenced material for future use, in case the site goes down. The text may also be needed if the material in question is being used as a direct quote and is properly cited and sourced. The method to copy protected text described here has the highest rate of success, but there are other ways to copy content from protected web pages. There are Two Methods given below

Method 1:

To overcome this restriction, follow below steps:

  1. Go to the website which restricts you from selecting and copying.
  2. Copy below javascript and paste it at the address bar and hit enter key.
javascript:void(document.onselectstart=null)


3) Now you can select and copy the text from this website using conventional way – highlight the text followed by CTRL C to copy, then paste it into notepad or word document.

Method 2:

Using Firefox : 


1. Like Opera, Firefox allows you to configure JavaScript on any web. If you want to turn if off, just hit the Tools menu on the top bar and click Option.

2. Accessing Content panel, here you can easily control JavaScript by enable it (check it in the box) or disable it (uncheck the box option). Hit the OK button to finish.

If you type about:config in your URL bar


and search for 'javascript' there is an entry javascript.enabled which you can set to false or true by toggle.


Using Chrome :


     Go the website and press Ctrl + Shift + J you can get a console tab


     In the right corner you see setting icon click it


     And Check Disable Java Script.


     Hope this simple trick will able to help you overcome some situation whereby you need to copy the content for personal reference and please use this trick wisely!

NOTE : The methods illustrated here are for educational purposes only. It is not advised to copy any copyrighted material in any webpage for commercial purposes. The methods illustrated are STRICTLY for non - commercial, personal use only.